
For Version 6.1 and Higher
Before attempting to process payments, you must have first completed integration.
Step 1: From the Patient Ledger, click on [New] → [Payment].

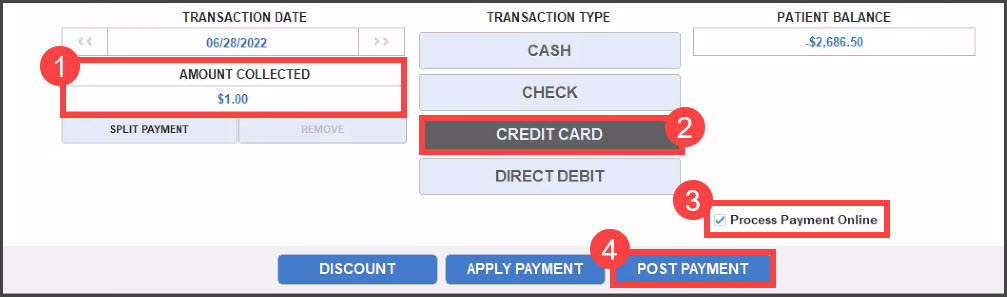
Step 2: On the Payment screen, click on the [Amount Collected] field → type in the payment amount → and click [OK].
Step 3: Select the [Credit Card] button and the [Process Payment Online] button (if not already defaulted).
Step 4: Click the [Post Payment] button.
Step 5: If you are set up to choose your Cash Practice® Provider on a payment-by-payment basis, then select the Cash Practice® Provider drop-down menu.
Note: If you chose a default Cash Practice® Provider in the Payment Setup screen (Step 17 of THIS article), this dialog box will not appear. Please skip to next step.
Step 6: Select the [Auto-Debit Scheduler].

Step 7: [Select] Transaction Options
Note: If this is a new transaction and a client account has not been created inside Cash Practice® the ”Add New Account” screen may appear, Client demographic information from ChiroTouch® will automatically pre-populate into this section – confirm the information and hit the save button at the bottom of the pop-up screen. Then repeat steps to set up the auto-debit.
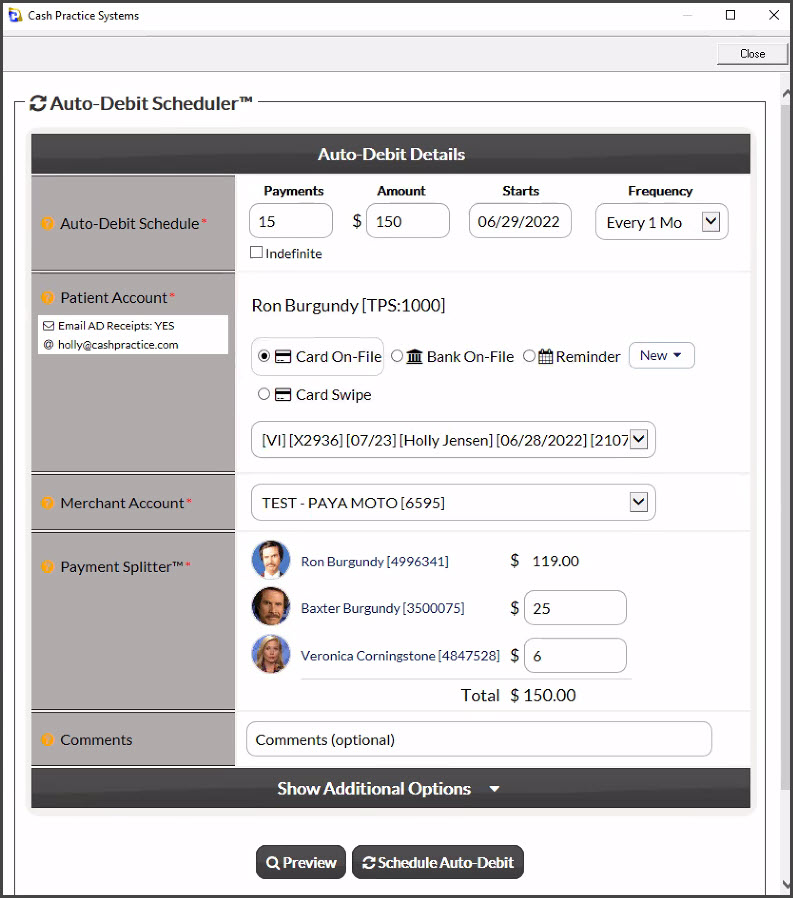
- Payments: Enter the number of payments for the scheduled auto-debit or check the [Indefinite] box to have the payments go forever.
- Amount: The amount you previously entered in the [Amount Collected] field will transfer over.
- Starts: Enter the month, day, and year that you want the Auto-Debit to begin (the following day is the soonest you can begin the auto-debit).
- Frequency: Select the payment Frequency (Weekly, Bi-Weekly, Monthly, Bi-Monthly, Quarterly, Semi-Annually, or Annually.
Patient Account:
- New: Select this button if you need to type in a new card number or bank account for the patients auto-debit.
- Fill in your patients card information and their billing address info.
- Billing Vault: (Optional) You can check off the box to save this new card as the patients default card, as well as nickname the card.
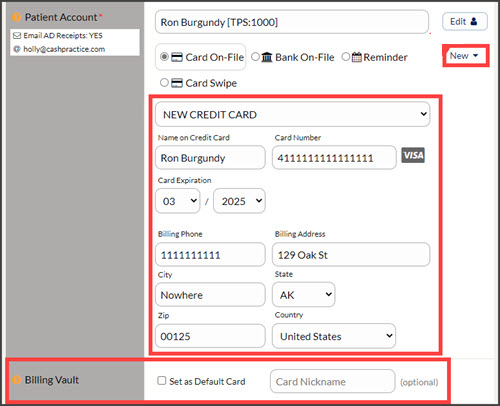
- Card On-File: This will allow you to access any cards saved on file.
- Note: If the patient has a card saved as their default, that card will autofill in the drop-down menu (however, you can select a different card if needed).
- Bank On-File: This will allow you to access any bank accounts saved on file.
- Note: If the patient has a bank account saved as their default, that bank account will autofill in the drop-down menu (however, you can select a different bank account if needed).
- Card Swipe: Use a Cash Practice® USB Card Swiper or Scriptel Signature device to swipe a card and collect the card data. The card will not be charged until the "Start" date.
- Reminder: Auto-Debit Reminders are to be used when the client has a monthly payment but it is not running automatically in Cash Practice® (i.e. over the counter with a check or cash).
Merchant Account: The defaulted merchant account will be displayed, but if using multiple merchant accounts with us, make the correct selection here. For more information, contact our Merchant Services Department by phone at (877) 343-8950 x102) or email MerchantAccounts@CashPractice.com
Payment Splitter: If you need to split the auto-debit amongst multiple family members, apply the amount to each field that it's needed for.
Comments: (OPTIONAL) Add a comment for your team's eyes only. This will be displayed on the Posted Payments Report when reviewing the transaction details in the future
Show Additional Options: (OPTIONAL) By clicking the drop-down, you have the capability to assign auto-debit groups, Drip-Education campaigns for frequent contact, and Patient Groups to better organize your patient lists
Step 8: When ready, click on [Schedule Auto-Debit] and click [OK] to proceed.
Step 9: Print the payment authorization form by clicking on the [PRINT] button.
