
You can create your own campaigns... but you don't have to!!
Although you can create your own campaigns, the Drip-Ed™Campaign Library has many campaigns for you to begin using right away. Some of the most popular include campaigns for New Patient Education, Birthday Cards, and Weekly Handouts.
Click the Self Help button to use the Cash Practice® Walkthrough when logged into your account

Getting started:
Step 1: Hover over [Systems] → click on [Drip-Education® ] → [Build New Campaign]

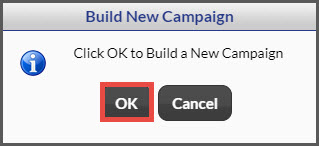
Step 2: Click the [OK] button to start a new campaign.
Step 3: Start working on your content:
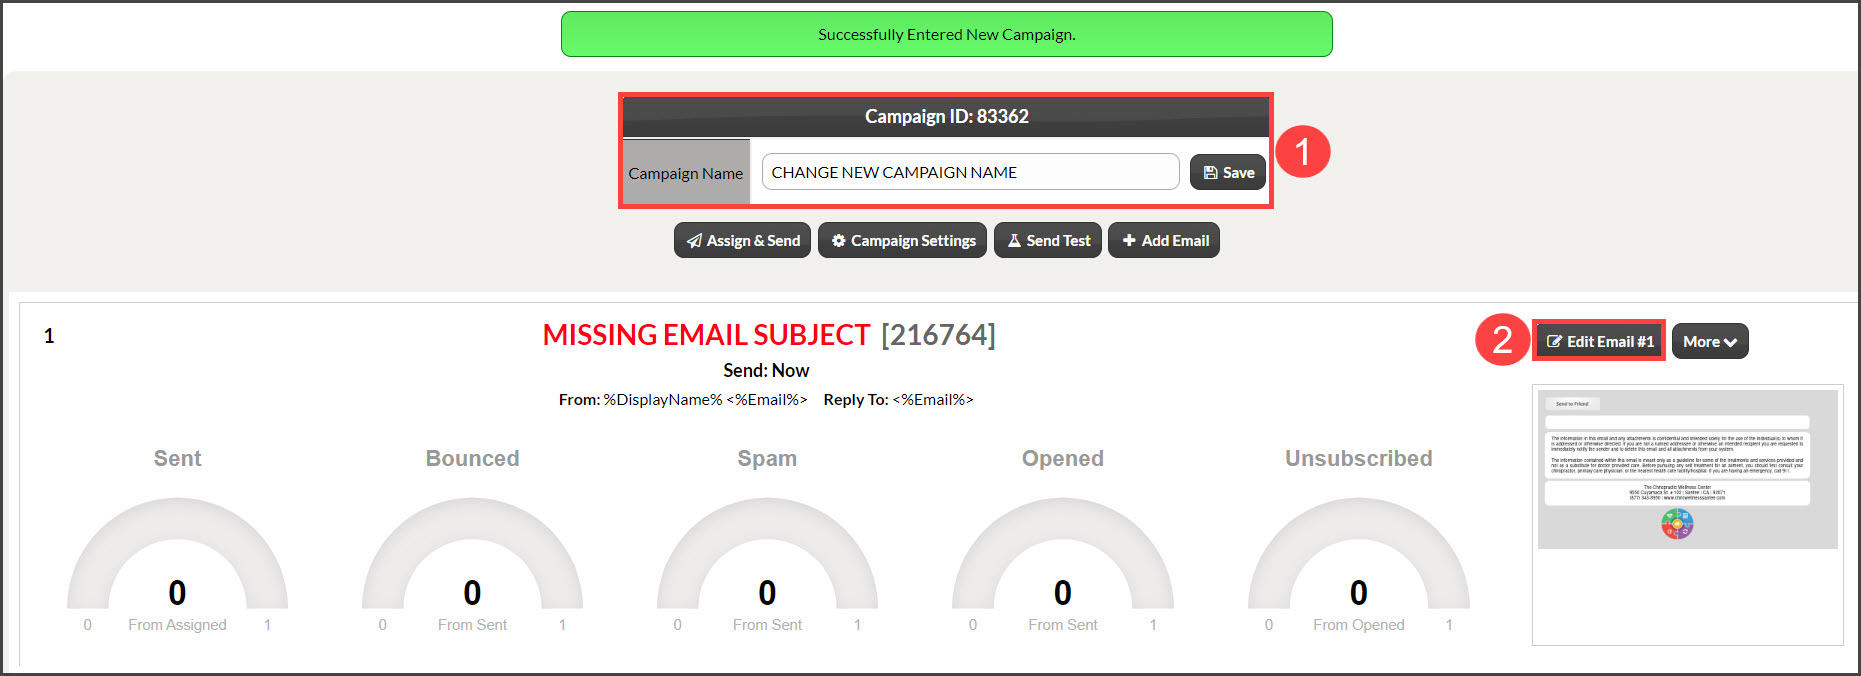
- Change the Campaign name to something that makes it easy to locate this in the future as well as will stand out when assigning it to patients. Click [Save].
- Click the [Edit Email #1] button to add in your campaign content.
Step 4: Create your campaign email. Be sure to click the [Save] button when finished, or before you start working on something else.
1: Add in the email's subject line. Be sure to make this eye-catching as this is what appears when your patient is seeing your email in their inbox. You may make this customized by using the Mail Merge Variable [%] tool to the right to add in the first name for a more bespoke touch.
2: Select the frequency campaign emails are sent. For example, if you have 4 emails in 1 campaign, you most likely want their send times to be staggered. Here is where you would choose to have Email #1 selected as "Send Now" and then have Email #2 selected as "Send in 7 days", and so on. Click HERE to find out how to add more emails to a campaign. Or click [More] → [+Add Email].
3: Add in your email content! Start by typing out your message here in the email text box.
4: Use some of our tools:
- Branding (Paint Brush): This tool allows you to brand your emails with a background color, border, as well as other visual settings.
- Templates (Puzzle Piece): Templates are a great way to streamline creating a new email. Simply click [Show Templates Library], choose the applicable template, and edit the content. Easy!
- Mail Merge Variables (%): Variables are like an auto-fill code for the content to be inserted into the message; Just like with our Subject line, you are able to add in their first name as well as additional information such as the office address, phone number, social media links, and much more.
- Add Images (Picture Icon with Mountain & Sun): Add in images is a great way to customize content even more. Add new images and place them where you'd like in the email. TIP! If the image is too large or small, right-click and edit the width and height until you have the right size.
- Link Trackers (Cursor Icon): We consider this to be an advanced user feature. This tool provides the ability to link CP Online Forms™ within your emails as well as track how many times the link is clicked. For more information, please click HERE or reach out directly to our Member Support Team.
- Auto-Saved Email Drafts (Paper with folded corner): We've all been there, multitasking and forgetting to save our work. You come back and it's still here! The Auto-Saved Drafts tool allows you access to all unsaved content to be re-used within this campaign email.
5: Editing tools. Very similar to other word processors, you have the capability to bold words, increase the font size, center, hyperlink images, and much more.
6: Save!

For more information on how to send out your campaign emails, watch our Quickstart video on the Drip-Education System HERE.